
직접 부딪히고 공부하며 작성한 코드라 많이 부족한 예제와 설명일 수 있습니다. 틀린 설명이 있거나 더 좋은 방법이 있다면 의견은 언제나 환영입니다!
이번 포스팅의 목표는 멤버 변수 리스트 출력하기(변수 타입, 변수 이름, 변수 값)이다. ClassInfo 에 Property 의 정보를 자동으로 등록해주는 매크로는 아래와 같다.
#define PROPERTY(PropertyName) \
inline static struct Regist_##PropertyName \
{ \
	Regist_##PropertyName() \
	{ \
		PropertyRegister<ClassType, decltype(ClassType::PropertyName)> propertyRegister_##PropertyName \
		{ \
			PropertyInitializer{ #PropertyName, typeid(decltype(ClassType::PropertyName)).name(), GetMemberOffset<ClassType, decltype(ClassType::PropertyName)>(&ClassType::PropertyName) } \
		}; \
	} \
} regist_##PropertyName; \
\
실제로 생성되는 변수의 클래스는 다음과 같다.
class Property
{
public:
	virtual std::string GetName() = 0;
	virtual std::string GetType() = 0;

	virtual void GetValue(void* classInstance, void* outValue) = 0;
	virtual void SetValue(void* classInstance, std::any value) = 0;

	virtual void PrintSignature() = 0;
};

template <typename T>
class PropertyHandler : public Property
{
    // 아래에서 설명
	using BytePtr = char*;
    using PropertyType = T;

public:
    // 변수 정보를 초기화하는 생성자
	Property(const PropertyInitializer& initializer)
		: propertyName(initializer.name)
		, propertyType(initializer.type)
		, propertyOffset(initializer.offset)
	{
	}

    // 변수의 이름과 자료형을 반환하는 Getter
	std::string GetName() override { return propertyName; }
	std::string GetType() override { return propertyType; }

    // 변수의 값을 반환하는 함수
	void GetValue(void* classInstance, void* outValue) override;

    // 변수의 값을 설정하는 함수
	template <typename T>
	void SetValue(void* classInstance,  std::any value) override;

    // 자신의 정보를 출력하는 함수
	void PrintSignature() override;

private:
	std::string propertyName;   // 변수 이름
	std::string propertyType;   // 변수 자료형
	std::size_t propertyOffset; // 변수 오프셋
};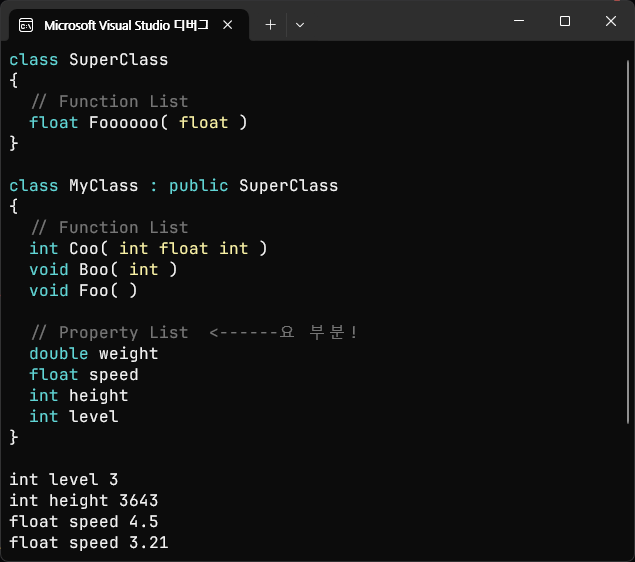
리플렉션이 완료된 후, PrintClassInfo() 함수를 호출해 클래스 정보를 호출한 결과물이다. 이번 포스팅에서는 화살표로 표시해둔 부분(멤버 변수 리스트)을 출력하는 것을 목표로 하고, 값을 읽고 쓰는 것까지 해보려고 한다.
class MyClass : public SuperClass
{
    GENERATED_BODY(MyClass)

private:
    int level = 3;
    PROPERTY(level)
};
나는 변수 밑에 PROPERTY(변수명) 매크로를 넣어 변수 정보를 ClassInfo 에 자동으로 등록하는 방식을 사용했다.
int level = 3;
inline static struct Regist_level
{
	Regist_level()
    {
		PropertyRegister<ClassType, decltype(ClassType::level)>
        propertyRegister_level
        {
			PropertyInitializer{
				"level",
				typeid(decltype(ClassType::level)).name(),
				GetMemberOffset<ClassType, decltype(ClassType::level)>(&ClassType::level)
				}
		};
	}
} regist_level;
PROPERTY 매크로를 확장해보면 다음과 같다.
변수명을 이용해 계속해서 새로운 구조체를 선언해주는 것을 볼 수 있다. 클래스에는 여러개의 변수가 있을 수 있고, 모든 변수를 자동으로 등록하고 관리해야 하기 때문에 이렇게 구현했다.
inline static struct Regist_level: 변수를 등록하는 구조체를 정의한다. 프로그램 실행 시 단 하나의 객체만 생성되어야 하므로static키워드를 사용하고, 정적 변수를 헤더 파일에 포함할 수 있도록 하기 위해inline키워드를 사용했다. 정적 변수는 여러 번 정의되면 컴파일 오류가 나는데,inline키워드를 붙이면 컴파일러가 한 번만 생성하도록 보장해준다고 한다.PropertyRegister<ClassType, decltype(ClassType::level)> propertyRegister_level{PropertyInitializer{ ... }};:Regist_level의 생성자에서 프로퍼티 등록기를 만들고, 초기화 구조체를 사용해 변수 정보를 초기화한 후,ClassInfo에 변수를 등록해준다.regist_level;: 정적 구조체 변수를 생성하는 부분이다.regist_level이 생성될 때Regist_level의 생성자가 불리며 클래스 정보에 변수가 등록되게 된다.
변수 등록하기
PropertyRegister
template <typename OwnerClassType, typename PropertyType>
class PropertyRegister
{
public:
	PropertyRegister(const PropertyInitializer& initializer)
	{
		PropertyHandler<PropertyType>* property
               = new PropertyHandler<PropertyType>(initializer);
		OwnerClassType::GetClass().AddProperty(initializer.name, property);
	}
};
변수 등록기는 변수 초기화 구조체를 받아 변수의 메타데이터를 생성하고, 클래스에 변수를 등록하는 역할을 한다.
	void AddProperty(std::string name, Property* property)
	{
		properties.insert(std::make_pair(name, property));
	}
ClassInfo 의 AddProperty 함수는 다음과 같다. 변수의 이름과 메타데이터의 주소를 받아 변수 리스트에 단순히 삽입해준다.
PropertyInitializer
struct PropertyInitializer
{
	PropertyInitializer(std::string name, std::string type, size_t offset)
		: name(name)
		, type(type)
		, offset(offset)
	{}
	std::string name;
	std::string type;
	size_t offset;
};
PropertyInitializer {
"level", typeid(decltype(ClassType::level)).name(),
GetMemberOffset<ClassType, decltype(ClassType::level)>(&ClassType::level)
}변수를 초기화해주는 초기화 구조체이다. 변수의 이름과 자료형, 오프셋 정보를 받는 것을 알 수 있는데, 하나씩 살펴보도록 하자.
변수 자료형 받아오기
typeid 는 C++의 런타임 타입 정보를 제공하는 기능인데, 객체의 실제 타입을 확인할 때 활용할 수 있다. decltype 은 컴파일 타임에 표현식의 타입을 가져오는 기능이며, 변수의 타입을 자동으로 추출할 때 유용하다. 나는 이 두 기능을 활용해 클래스의 멤버 변수 타입을 가져오도록 했다.
decltype(ClassType::level): 클래스의level변수를 가져와 해당 변수의 타입을 추출typeid(decltype(ClassType::level)).name(): 추출한 변수 타입을typeid를 이용해 문자열로 변환
나는 변수의 타입을 문자열로 저장하도록 구현했지만, using 을 활용해 Property 클래스 내부에 타입을 가지고 있도록 해도 될 것 같다.
클래스 멤버 변수 오프셋 계산하기
template <typename ClassType, typename MemberType>
constexpr std::size_t GetMemberOffset(MemberType ClassType::* member)
{
	return reinterpret_cast<std::size_t>(&((ClassType*)nullptr->*member));
}
어떻게 보면 변수 리플렉션에서 이부분이 가장 중요하다고 볼 수 있을 것 같다. 객체의 특정 멤버 변수에 직접 접근하려면, 멤버 변수가 클래스 객체 내에서 얼마나 떨어져 있는지 알아야 하기 때문이다.
&((ClassType*)nullptr->*member): 클래스 객체를 실제로 생성하지 않고 멤버 변수의 주소를 가져오기 위해nullptr을ClassType*로 변환해서 가짜 객체를 만든다.->*연산자는 객체 포인터에서 멤버 변수를 가리킬 때 사용하는 연산자이다. 해당 연산자를 사용해 멤버 변수의 상대적인 오프셋을 가져온 뒤,&를 사용해 멤버 변수의 주소를 얻는다.reinterpret_cast<std::size_t>(...): 주소를 정수로 변환하여 반환한다.
level 변수는 클래스의 첫 번째 멤버 변수이므로, 오프셋은 0이다.
변수 값 읽고 쓰기
이제 변수에 접근해서 값을 읽고 쓰는 부분을 보자.
	Property* FindPropertyByName(std::string name)
	{
		const auto& iter = properties.find(name);
		if (iter != properties.end())
		{
			return iter->second;
		}
		else
		{
			return nullptr;
		}
	}
ClassInfo 클래스에 FindPropertyByName 함수를 만들어 주었다. 문자열을 받아 변수의 메타데이터를 찾고 반환해주는 함수이다.
GetValue
    Property* level = MyClass::GetClass().FindPropertyByName("level");
    if (level)
    {
		int value;
		level->GetValue(&myclass, &value);
    }
값을 받아올 변수를 만들고, GetValue 함수에 클래스 인스턴스와 함께 전달해주면 된다. 타입 안정성은 고려하지 않았다.
void GetValue(void* classInstance, void* outValue) override
{
	*reinterpret_cast<PropertyType*>(outValue) = *reinterpret_cast<PropertyType*>(reinterpret_cast<BytePtr>(classInstance) + propertyOffset);
}
PropertyHandler 클래스의 GetValue 함수이다.
reinterpret_cast<BytePtr>(classInstance): 먼저 클래스 인스턴스를BytePtr로 변환해준다.BytePtr은char*를 별칭으로 지정해둔 것인데, 포인터 연산을 1바이트 크기로 동작하게 하기 위해서이다.+ propertyOffset: 아까 계산해둔 멤버 변수의 오프셋이다. 객체의 시작 주소에서 오프셋만큼 이동하면 해당 멤버 변수의 주소를 얻을 수 있다.*reinterpret_cast<PropertyType*>: 이제 원래 프로퍼티의 타입으로 변환하고*를 통해 실제 변수 값에 접근해준다.void*인outValue를reinterpret_cast를 통해 프로퍼티 타입의 포인터로 변환해주고, 역참조한 곳에 방금 가져온 값을 대입해준다.
SetValue
level->SetValue(&myclass, 6);SetValue 도 동작 방식은 똑같다. 다만 Set 할 값을 std::any 로 설정해 두었다.
void SetValue(void* classInstance, std::any value) override
{
	*reinterpret_cast<PropertyType*>(reinterpret_cast<BytePtr>(classInstance) + propertyOffset) = std::any_cast<PropertyType>(value);
}
변수의 위치를 찾고, 그 위치에 방금 받아온 value 를 넣어주면 끝!
구현 결과
class MyClass : public SuperClass
{
    GENERATED_BODY(MyClass)

private:
    int level = 3;
    PROPERTY(level)

	int height = 3643;
	PROPERTY(height)

    float speed = 4.5f;
    PROPERTY(speed)
};
MyClass 에 여러개의 변수를 선언 및 초기화 해주고,
int main()
{
    MyClass myclass;

    Property* level = MyClass::GetClass().FindPropertyByName("level");
    if (level)
    {
		int value;
		level->SetValue(&myclass, 6);
		level->GetValue(&myclass, &value);
		level->PrintSignature();
		std::cout << " = " << value << std::endl;
    }

	Property* height = MyClass::GetClass().FindPropertyByName("height");
	if (height)
	{
		int value;
		height->GetValue(&myclass, &value);
		height->PrintSignature();
		std::cout << " = " << value << std::endl;
	}

	Property* speed = MyClass::GetClass().FindPropertyByName("speed");
	if (speed)
	{
		float value;
		speed->GetValue(&myclass, &value);
		speed->PrintSignature();
		std::cout << " = " << value << std::endl;

		speed->SetValue(&myclass, 3.21f);
		speed->GetValue(&myclass, &value);
		speed->PrintSignature();
		std::cout << " = " << value << std::endl;
	}
}
콘솔로 출력해보면
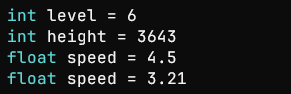
Get / Set 이 잘 되는 모습을 볼 수 있다 ᵔᴥᵔ